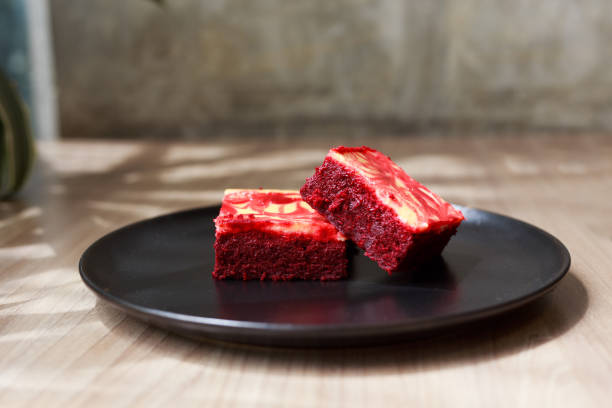
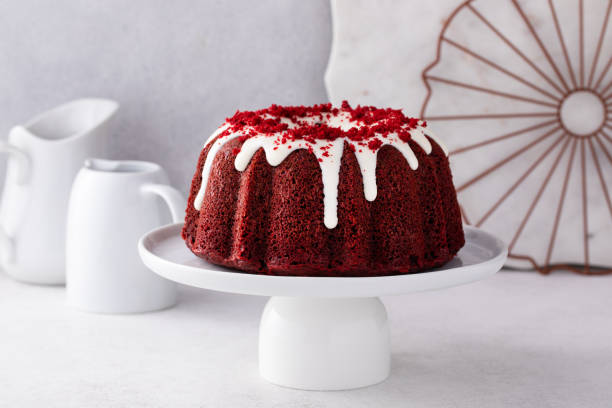
Red Velvet Pound Cake Recipe: A Deliciously Moist Delight
Red velvet cake has a captivating history that dates back to the early 20th century, evolving from a simple chocolate cake into the beloved dessert that we know today. Initially made famous by its striking red color and velvety texture, red velvet cake has roots in the Southern United States, where it gained popularity in restaurants and bakeries. The unique pairing of cocoa powder and buttermilk, along with a hint of vanilla, creates a flavor profile that is both rich and satisfying. Over time, this classic dessert has seen many adaptations, leading to the emergence of various forms, including the delightful red velvet pound cake.
What sets red velvet pound cake apart from traditional red velvet cake is its denser, more buttery texture reminiscent of classic pound cake. The dense crumb allows the signature flavor of red velvet to shine while adding a unique twist that makes it a favorite among dessert enthusiasts. This article takes you through everything you need to know about red velvet pound cake, starting with an exploration of its origins, the key ingredients that give it its distinctive taste, and a step-by-step recipe to guide you in making your own. We will also delve into serving suggestions, common mistakes to avoid, healthier alternatives, and answer the most frequently asked questions about this delectable treat. Get ready to indulge in the rich and delicious world of red velvet pound cake!
What is Red Velvet Pound Cake?
Red velvet pound cake is a delicious twist on the classic red velvet cake, combining the rich flavors and striking color of the original with the dense, buttery texture typical of pound cakes. This unique dessert captures the essence of red velvet while adding a new layer of indulgence. Understanding its origins and flavor profile can enhance the enjoyment and appreciation of this delightful cake.
Origin and History
The origins of the red velvet flavor can be traced back to the early 20th century in the Southern United States, where this visually stunning cake first gained popularity. With its surprisingly soft texture and vibrant red color, red velvet cake quickly became a festive favorite, often served at special occasions and celebrations. Traditional recipes incorporated cocoa powder, which reacted with acidic ingredients like buttermilk to create a subtle chocolate flavor.
Over the years, bakers began experimenting with the basic red velvet recipe, leading to the creation of variations, including the red velvet pound cake. This version embraces the rich history while offering a denser, more structured bite, making it a perfect choice for those who enjoy a heartier dessert.
Flavor Profile
The flavor profile of red velvet pound cake is a delightful combination of cocoa, buttermilk, and vanilla. The cocoa powder provides a mild chocolate taste, while the buttermilk adds a tangy richness, enhancing the overall flavor. Vanilla extract complements these flavors, rounding out the palate.
In terms of texture, red velvet pound cake stands out compared to other cakes. The denser crumb, a hallmark of pound cakes, not only makes it more satisfying but also allows the signature red velvet flavors to shine. This unique texture empowers bakeries and home bakers alike to explore different frosting and serving options, making it a versatile dessert for any occasion.
Main Ingredients
The key ingredients that contribute to the flavor and texture of red velvet pound cake include flour, cocoa powder, buttermilk, food coloring, butter, sugar, and eggs. Each ingredient plays a pivotal role in creating the classic characteristics of this beloved dessert.
Key Ingredients
- Flour: All-purpose flour forms the base of the cake, providing structure and stability.
- Cocoa Powder: This ingredient adds a subtle chocolate flavor and contributes to the rich color of the cake.
- Buttermilk: The acidity of buttermilk helps to tenderize the cake and enhances the flavor combination.
- Food Coloring: The vibrant red hue is typically achieved using liquid or gel food coloring, which is essential for the classic aesthetic.
- Butter: Butter enriches the cake, contributing to its moistness and flavor.
- Sugar: Sugar not only sweetens the cake but also aids in creating that tender crumb.
- Eggs: Eggs bind the ingredients together and provide moisture and richness.
Ingredient Variations
When preparing red velvet pound cake, some bakers may choose to use natural food coloring instead of artificial options. Natural coloring from beets or other fruits can achieve a lovely hue, though the color might be less vibrant than traditional dyes.
Moreover, for those seeking dairy alternatives, substituting buttermilk with plant-based milk mixed with vinegar or lemon juice can create a vegan-friendly version. This versatility in ingredients allows more people to enjoy the beloved flavors of red velvet pound cake, regardless of dietary preferences.

How to Make Red Velvet Pound Cake
Making a red velvet pound cake at home is a rewarding experience that allows you to enjoy its rich flavors and distinct appearance. Below, you will find a detailed step-by-step recipe to guide you through the process, along with some helpful tips to ensure your cake turns out perfectly.
Ingredients
- 2 cups all-purpose flour
- 1/2 cup cocoa powder
- 1 cup buttermilk, at room temperature
- 1 tablespoon red liquid food coloring
- 1 cup unsalted butter, softened
- 2 cups granulated sugar
- 4 large eggs, at room temperature
- 1 teaspoon vanilla extract
- 1 teaspoon baking powder
- 1/2 teaspoon baking soda
- 1/2 teaspoon salt
Directions
Follow these steps to create your delicious red velvet pound cake:
- Preheat the Oven: Begin by preheating your oven to 325°F (163°C). Grease and flour a 10-inch bundt pan or loaf pan to prevent sticking.
- Mix Dry Ingredients: In a medium bowl, sift together the flour, cocoa powder, baking powder, baking soda, and salt. Set this mixture aside.
- Prepare Wet Mixture: In another large mixing bowl, cream together the softened butter and sugar using an electric mixer on medium speed until light and fluffy. This should take about 3-5 minutes.
- Add Eggs and Vanilla: Beat in the eggs, one at a time, ensuring each is fully incorporated before adding the next. Add the vanilla extract and mix until combined.
- Combine Mixtures: Gradually add the dry ingredient mixture to the wet ingredients, alternating with the buttermilk. Start and end with the dry ingredients, mixing until just combined. Be careful not to overmix.
- Add Food Coloring: Gently fold in the red food coloring, ensuring an even distribution throughout the batter.
- Bake: Pour the batter into the prepared pan, smoothing the top. Bake for 55-60 minutes, or until a toothpick inserted into the center comes out clean.
- Cool: Allow the cake to cool in the pan for about 10 minutes, then invert it onto a wire rack to cool completely.
Baking Tips and Advice
To ensure optimal results when baking your red velvet pound cake, consider the following tips:
- Ideal Baking Temperature: Always preheat your oven to the specified temperature to avoid uneven baking.
- Measuring Ingredients: Use the spoon-and-level method for measuring flour to avoid packing it into the cup, which can lead to a dry cake.
- Testing for Doneness: To check if the cake is done, insert a toothpick into the center. It should come out clean or with a few crumbs attached, not wet batter.
Serving Suggestions
Red velvet pound cake is delightful on its own, but adding a complementing frosting or pairing it with specific beverages can enhance the enjoyment.
Frosting Options
- Cream Cheese Frosting: A classic pairing, cream cheese frosting balances the sweetness of the cake with a tangy flavor. Spread generously on top of sliced cake for a delightful treat.
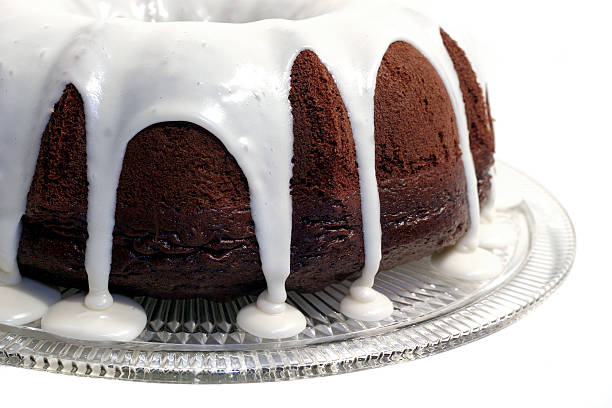
- Chocolate Ganache: For chocolate lovers, drizzling warm chocolate ganache over the cake adds richness and a beautiful shine.
- Whipped Cream: Light and airy, whipped cream offers a simple yet delicious option, perfect for those who prefer less sweetness.
Pairing Recommendations
Enjoy your red velvet pound cake with a variety of beverages for an indulgent experience:
- Coffee: A hot cup of coffee enhances the cake’s flavors and provides a comforting accompaniment.
- Tea: Consider a chai or vanilla-flavored tea for a complementary pairing.
- Milk: A cold glass of milk balances the sweetness and richness of the cake, making it a popular choice for dessert enthusiasts.
Common Mistakes to Avoid
To achieve the best results when baking your red velvet pound cake, keep in mind the following common pitfalls to avoid:
- Overmixing the Batter: Mixing too much can lead to a tough cake. Mix until ingredients are just combined for a tender crumb.
- Using Expired Ingredients: Always check the expiration dates on your baking powder, baking soda, and eggs to ensure optimal results.
- Not Greasing the Pan Properly: Ensure your pan is well-greased and floured to prevent the cake from sticking after baking.
FAQs About Red Velvet Pound Cake
What makes red velvet pound cake different from regular pound cake?
Red velvet pound cake has the same dense, buttery texture as traditional pound cake, but it features the distinctive flavors and striking color of red velvet cake, achieved through cocoa powder and red food coloring.
Can I make red velvet pound cake without food coloring?
Yes, you can omit or reduce the food coloring if desired. The cake will still have a chocolate flavor but will not have the iconic red hue.
Is red velvet pound cake the same as red velvet cake?
No, while both cakes share similar ingredients, red velvet cake is typically lighter and fluffier, while red velvet pound cake is denser and richer, resembling a traditional pound cake.
How do I store leftover red velvet pound cake?
Store leftover cake in an airtight container at room temperature for up to 3 days. If longer storage is needed, wrap it in plastic wrap and freeze for up to 3 months. Thaw in the refrigerator before serving.
Healthier Alternatives
For those looking to enjoy red velvet pound cake with a healthier twist, consider these substitutions:
Substituting Ingredients
- Whole Wheat Flour Option: Substitute half or all of the all-purpose flour with whole wheat flour for additional fiber and nutrients. Keep in mind that the texture may be slightly denser.
- Reducing Sugar Content: Consider using less sugar or natural sweeteners such as honey or maple syrup to reduce calorie intake while still enjoying the cake’s flavor.
Conclusion
In this guide, we have explored the fascinating history, unique characteristics, and delightful ways to make and serve red velvet pound cake. With its rich flavors and striking color, this dessert is sure to impress. We encourage you to gather your ingredients, follow the recipe, and experiment with your own creative serving suggestions. Don’t forget to share your baking experiences with friends and family, as they will surely want to join you in this indulgent treat!

red velvet pound cake
Equipment
- 1 9x5 inch loaf pan
- 1 mixing bowls
- 1 electric mixer or whisk
- 1 rubber spatula
- 1 measuring cups
- 1 measuring spoons
- 1 cooling rack
- 1 toothpick or cake tester
Ingredients
- 1.5 cups all-purpose flour
- 1 cup granulated sugar
- 0.5 cup unsalted butter, softened
- 3 large eggs
- 0.25 cup buttermilk
- 1 tablespoon cocoa powder
- 1 teaspoon vanilla extract
- 1 teaspoon baking powder
- 0.5 teaspoon salt
- 1 tablespoon red food coloring
Instructions
- Preheat your oven to 325°F (163°C) and grease and flour a 9x5 inch loaf pan.
- In a mixing bowl, cream together the softened butter and granulated sugar until light and fluffy.
- Add the eggs one at a time, mixing well after each addition. Then mix in the buttermilk, vanilla extract, and red food coloring.
- In a separate bowl, whisk together the flour, cocoa powder, baking powder, and salt.
- Gradually add the dry ingredients to the wet ingredients, mixing until just combined. Do not overmix.
- Pour the batter into the prepared loaf pan and smooth the top with a spatula.
- Bake in the preheated oven for about 70 minutes, or until a toothpick inserted in the center comes out clean.
- Once baked, remove from the oven and let the cake cool in the pan for about 15 minutes. Then transfer it to a cooling rack to cool completely.
- For an added touch, consider frosting the cooled pound cake with cream cheese frosting.