No-Bake Buckeye Cheesecake Bars: Easy Recipe & Tips
No-Bake Buckeye Cheesecake Bars are a delightful dessert that brings together the beloved flavors of Ohio’s famous Buckeye candy with the creamy richness of cheesecake. Characterized by a crumbly graham cracker crust, a velvety peanut butter cheesecake filling, and a luscious chocolate topping, these bars offer the perfect combination of sweet and savory. They’re easy to make, require no baking, and are sure to satisfy any sweet tooth, making them an ideal treat for gatherings, parties, or just a cozy night in.
The popularity of No-Bake Buckeye Cheesecake Bars can be attributed to their nostalgia-inducing flavors and their simplicity. They combine the classic American treat of peanut butter and chocolate in a new, more decadent form. With their rich texture and sweet taste, these bars are irresistibly scrumptious and can please a crowd. Moreover, their ease of preparation allows even novice bakers to whip up a stunning dessert that looks as beautiful as it tastes. The fact that they’re no-bake means they can be made any time of the year without heating up the kitchen—a definite bonus during warmer months.
This article will take you through everything you need to know about making No-Bake Buckeye Cheesecake Bars, starting with a detailed list of ingredients that you’ll need for the crust, filling, and chocolate topping. Next, we’ll provide step-by-step directions to ensure your bars come out perfectly every time. Additionally, we’ll share valuable advice and tips for variations and serving suggestions. With a special section addressing common questions, you’ll have all the tools at your fingertips to create this delectable dessert that’s sure to impress. Get ready to dive into the sweet world of No-Bake Buckeye Cheesecake Bars!
What Are No-Bake Buckeye Cheesecake Bars?
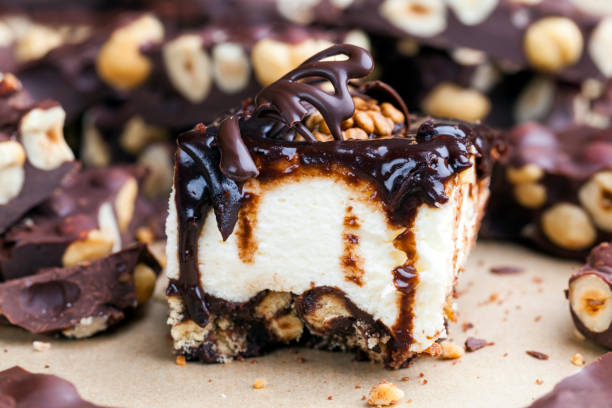
No-Bake Buckeye Cheesecake Bars are a heavenly fusion of two classic treats: Buckeye candy and creamy cheesecake. These bars capture the essence of Ohio’s beloved confection, known for its rich peanut butter center and delectable chocolate coating, and transform it into a luscious, no-bake dessert. With a crumbly graham cracker crust, a rich peanut butter cheesecake filling, and a smooth chocolate topping, they offer a delightful blend of textures and flavors. The best part? They don’t require an oven, making them an easy and accessible dessert option for anyone who loves sweet treats.
Why They’re Popular
The appeal of No-Bake Buckeye Cheesecake Bars lies not only in their taste but also in their nostalgic charm and simplicity. The combination of peanut butter and chocolate is a timeless favorite in American cuisine, often evoking warm memories associated with home baking and shared moments. These bars take that beloved pairing and elevate it to a more indulgent level, perfect for any occasion.
Another factor contributing to their popularity is their ease of preparation. With just a few straightforward steps, even those new to baking can achieve impressive results. As an added bonus, since they don’t require baking, you can whip them up any time of the year, especially on hot summer days when you want a sweet fix without heating up the kitchen. Their ability to please a crowd makes them ideal for gatherings, potlucks, or simply as a sweet treat to enjoy at home.
Ingredients
To create the delicious No-Bake Buckeye Cheesecake Bars, you’ll need a handful of simple ingredients divided into three primary components: the crust, the cheesecake filling, and the chocolate topping. Here’s a detailed breakdown of each ingredient required for this delightful dessert.
For the Crust:
- 1 ½ cups Graham cracker crumbs
- ⅓ cup sugar
- ⅓ cup unsalted butter, melted
For the Cheesecake Filling:
- 16 oz cream cheese, softened
- ½ cup sugar
- 1 cup Cool Whip (or whipped cream)
- ½ cup creamy peanut butter
- 1 tsp vanilla extract
For the Chocolate Topping:
- 1 cup semi-sweet chocolate chips
- 1 tablespoon coconut oil (or shortening)
Directions
Making No-Bake Buckeye Cheesecake Bars is an easy and rewarding process. Follow these step-by-step directions to create a delicious dessert that everyone will love.
Step 1: Prepare the Crust
In a medium bowl, combine the Graham cracker crumbs and sugar. Pour in the melted butter and mix until the crumbs are evenly coated and resemble wet sand. Press the mixture firmly and evenly into the bottom of a 9×9-inch baking pan to create a solid crust. Use the back of a measuring cup to help pack it down.
Step 2: Make the Cheesecake Filling
In a mixing bowl, beat the softened cream cheese and sugar together until smooth and creamy. Add the peanut butter and vanilla extract, continuing to beat until well combined. Gently fold in the Cool Whip or whipped cream, making sure to keep the mixture fluffy without deflating it.
Step 3: Assemble the Bars
Spread the cheesecake filling evenly over the prepared crust, making sure to get it into the corners of the pan. Use a spatula to smooth the top for a uniform surface.
Step 4: Prepare the Chocolate Topping
In a microwave-safe bowl or using a double boiler, combine the semi-sweet chocolate chips and coconut oil. Heat gently, stirring frequently, until the mixture is melted and smooth. Pour the melted chocolate over the cheesecake layer, spreading it evenly to cover the filling.
Step 5: Chill and Cut
Refrigerate the assembled dessert for at least 4 hours or until set. Once chilled, use a sharp knife to cut the bars into squares. For clean cuts, warm the knife under hot water and dry it before slicing.

No-Bake Buckeye Cheesecake Bars
Equipment
- 1 9x9 inch baking dish
- 1 mixing bowls
- 1 electric mixer or whisk
- 1 rubber spatula
- 1 measuring cups
- 1 measuring spoons
- 1 microwave-safe bowl
Ingredients
- 1.5 cups graham cracker crumbs
- 0.5 cup unsalted butter Melted.
- 1 cup creamy peanut butter
- 1 cup powdered sugar
- 8 oz cream cheese Softened.
- 1 teaspoon vanilla extract
- 1 cup heavy cream
- 1 cup chocolate chips
- 2 tablespoons coconut oil
Instructions
- Prepare the baking dish by lining it with parchment paper or greasing it lightly.
- In a mixing bowl, combine the graham cracker crumbs and melted butter. Mix until the crumbs are evenly coated. Press the mixture firmly into the bottom of the prepared baking dish to create the crust layer.
- In another bowl, mix the softened cream cheese, creamy peanut butter, powdered sugar, and vanilla extract. Use an electric mixer or whisk to blend until smooth and creamy.
- In a separate bowl, whip the heavy cream until stiff peaks form. Gently fold the whipped cream into the peanut butter mixture until fully combined.
- Pour the peanut butter cheesecake filling over the crust, spreading it evenly. Place the dish in the refrigerator to chill for at least 2 hours or until set.
- While the cheesecake is chilling, prepare the chocolate topping. Melt the chocolate chips and coconut oil together in a microwave-safe bowl in 30-second increments, stirring until smooth.
- Once the cheesecake has set, pour the melted chocolate over the top, spreading it evenly.
- Return the bars to the refrigerator for an additional 30 minutes to allow the chocolate to firm up.
- Once set, remove the bars from the dish and cut into 12 equal pieces. Serve chilled.